Fitness: Increasing Core Stability
Make an Appointment
Our team is here to help you make an appointment with the specialists that you need.
Top of the pageActionset
Fitness: Increasing Core Stability
Overview
Increasing your core stability means making the muscles of your trunk stronger to keep your spine and body stable. This helps you stay balanced when you move. It can help improve your posture and strength and may help protect your body from injury.
How can you increase your core strength and stability?
Basic core stability exercises can be simple to do. But they take some practice. And it's important to do them the right way.
You can start by learning how to:
- Breathe with your diaphragm. The diaphragm is the large muscle that helps move air in and out of your lungs.
- Find your neutral spine. This is a posture that maintains the three normal curves in your spine—one in your neck, one in your upper back, and one in your lower back.
Then practice with some simple exercises, like:
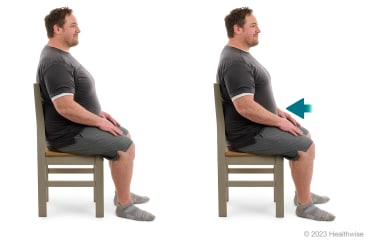
- Pulling your belly in (abdominal hollowing).
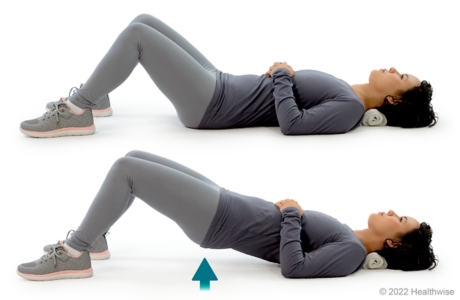
- Bridging (feet flat).
Some people find it helpful to work with a physical therapist. The therapist can make sure you're using the right muscles and breathing properly during the exercises. They can also show you more exercises to do.
Breathing with your diaphragm

- Lie on your back. You can put a small rolled towel behind your neck or use a pillow for comfort. Or you can prop yourself up on several pillows.
- Put one hand on your belly and the other on your chest.
- Breathe in slowly through your nose. When you breathe in, push your belly out as far as possible. You should feel the hand on your belly move out, while the hand on your chest does not move.
- Breathe out slowly through your mouth. When you breathe out, you should feel the hand on your belly move in.
Practice this breathing method 3 or 4 times a day for about 10 minutes each time.
When you can do this type of breathing well while lying down, learn to do it while sitting or standing.
Finding your neutral spine
A neutral spine is the posture that maintains the three normal curves in your spine—one in your neck, one in your upper back, and one in your lower back. Your spine should be in this neutral position when you do core stability exercises. It may seem more relaxing to let yourself slump down. But when you lose the normal curves of a neutral spine, you actually put more stress on your body.
The instructions below are for finding a neutral spine when you are standing. You can also find your neutral spine while you lie on your back with your knees bent and while you sit. When you can find your neutral spine in these three positions, you can maintain good posture for daily activities and for exercise.
- Stand in front of a mirror with your hands on your hips.
Allow your low back to arch so your stomach juts forward, and your buttocks stick out. Notice how your hands rotate forward.
- Tighten the muscles around your stomach and buttocks.
Your low back becomes very flat. Notice how your hands rotate backward.
- Now go halfway between the forward and back positions.
- Stand tall with your ears and shoulders lined up over your hips.
Keep your pelvis in this neutral position.
Pulling your belly in (abdominal hollowing)

You can do this exercise anywhere, in any position. Try it while you work at your desk, drive, or stand waiting for your turn at the store.
- Pull in your belly and imagine pulling your belly button back toward your spine. (Remember to keep a neutral spine while you do this, and don't let your back bend forward. Neutral spine is the name for posture that maintains the three normal curves in your spine.)
- Hold this for about 6 seconds. Remember to keep breathing normally. Then relax.
- Repeat 8 to 12 times.
Bridging (feet flat)

- Lie on your back with both knees bent and your feet flat on the floor. Your knees should be bent about 90 degrees.
- Tighten your belly muscles by pulling your belly button in toward your spine. Keep breathing normally and don't hold your breath.
- Push your feet into the floor, squeeze your buttocks, and lift your hips off the floor until your shoulders, hips, and knees are all in a straight line. Keep your hips level.
- Hold for about 6 seconds.
- Slowly lower your hips back to the floor.
- Repeat 8 to 12 times.
Credits
Current as of: July 31, 2024
Author: Ignite Healthwise, LLC Staff
Clinical Review Board
All Healthwise education is reviewed by a team that includes physicians, nurses, advanced practitioners, registered dieticians, and other healthcare professionals.
Current as of: July 31, 2024
Author: Ignite Healthwise, LLC Staff
Clinical Review Board
All Healthwise education is reviewed by a team that includes physicians, nurses, advanced practitioners, registered dieticians, and other healthcare professionals.
This information does not replace the advice of a doctor. Ignite Healthwise, LLC, disclaims any warranty or liability for your use of this information. Your use of this information means that you agree to the Terms of Use. Learn how we develop our content.
To learn more about Ignite Healthwise, LLC, visit webmdignite.com.
© 2024-2025 Ignite Healthwise, LLC.
This information does not replace the advice of a doctor. Ignite Healthwise, LLC, disclaims any warranty or liability for your use of this information. Your use of this information means that you agree to the Terms of Use. Learn how we develop our content.


